ASUS Z87-Pro Motherboard Review
Introduction
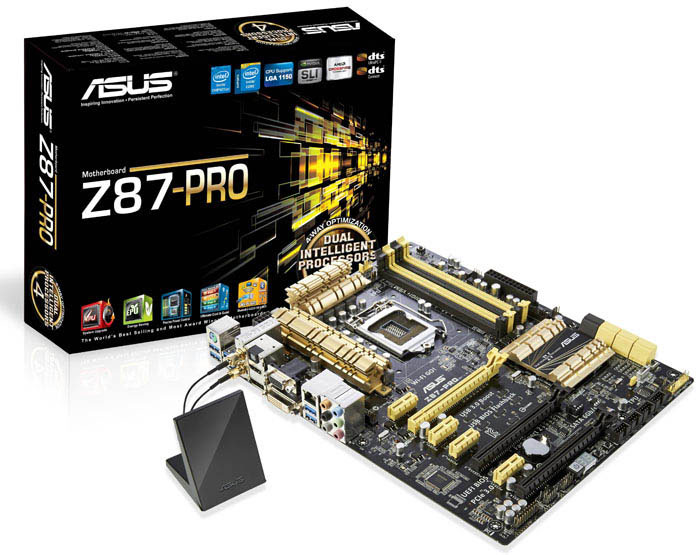
With the arrival of the much anticipated Haswell processor, Asus has released a variety of mainstream motherboards that are targeted at enthusiasts and gamers. Today we will be looking at the Z87-Pro which is the bigger brother to the Z87-A. I have had the Asus Z87-Pro for a few days now and I'm overall very impressed by its performance, durability and build quality.
The Asus Z87-Pro is an impressive mid-range motherboard that not only looks attractive but performs like a champ as well. The Z87-Pro sports the new black and gold color scheme which is supposed to convey a premium feel according to Asus. It comes with an endless amount of options for overclocking, fan customization and power saving options.
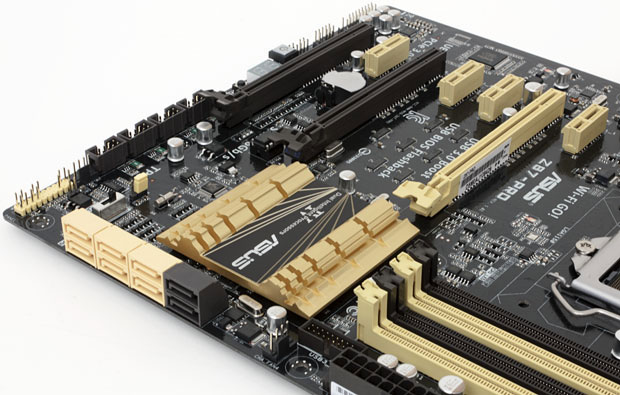
The Z87-Pro comes with a whopping eight SATAIII ports and they are all 6Gb/s ports. Six of those SATA III ports are from the Z87 chipset and two of those are from the ASMedia 1061 controller. Long gone are the days where you had only one or two SATAIII ports.
The motherboard is SLI and Crossfire ready so you can stick two of your favourite cards in there and get awesome performance (they won't run at full x16 but instead at x8 which is still more than enough). You also have four USB 3.0 ports via the Z87 chipset and four more from ASMedia 1042 controller.
It comes with a total of seven PCI-Express ports, three x16 ports and four x1 ports. The first two ports are PCI-Express x16 3.0 while the last one is 2.0 and it runs only at x4 mode. The board supports full x16 bandwidth but only with a single card. If you want to run dual GPUs, it will run at x8/x8 or if you want to run a triple card configuration then it would be x8/x8/x4.
Also, something to note about the Z87-Pro is that there are no PCI slots which might disappoint some people. I personally like that it doesn't have any PCI slots because it can take up precious space in the motherboard and they have become so outdated and slow nowadays but that might be just me.
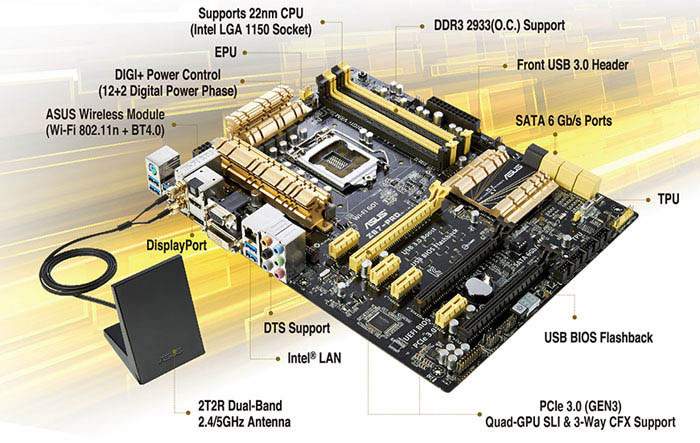
It comes with a stainless steel back I/O for great protection and extended motherboard lifespan. The build quality, performance and durability are as always absolutely fantastic with any Asus motherboard. The Z87-Pro also offers a massive 12+2-phase DIGI+ Power Control for extreme overclocking, fuse ICs for the DRAM and best of all, solid capacitors rated for 5,000 hours at 105C. The Z87-Pro is greatly designed to handle high volts really well and we'll later put it to the test. The layout of the motherboard is very clean with no real tight areas.
The heatsinks on the VRMs look great coated with the gold color scheme and they are short enough to stay away from most aftermarket CPU coolers so you can install huge CPU coolers like the Noctua NH-D14 without having to worry about interfering with it. The heatsinks have a bigger surface area for better heat dissipation and improved cooling which is the first thing I noticed when looking at the motherboard. This means it can handle more volts without overheating. On the back of the motherboard there are a few backplates where the VRMs are and this is to protect the circuitry and help with dissipating the heat.
Technical Specifications
| Asus Z87-Pro Specs | |
|---|---|
| CPU: | Intel Socket 1150 Supports Intel 22 nm CPU Supports Intel Turbo Boost Technology 2.0 |
| Chipset: | Intel Z87 |
| Memory: | 4 x DIMM, Max. 32GB Up To DDR3 3000 Mhz (O.C.) Non-ECC, Un-buffered Memory |
| Graphic: | Multi-VGA output support : HDMI/DVI-D/RGB/DisplayPort 1.2 ports Supports HDMI with max. resolution 4K @ 24 Hz / 2K @ 60 Hz |
| Multi-GPU Support: | NVIDIA Quad-GPU SLI Technology Supports AMD Quad-GPU CrossFireX Technology Supports AMD 3-Way CrossFireX Technology |
| Expansion Slots: | 2 x PCIe 3.0/2.0 x16 (x16 or dual x8) 1 x PCIe 2.0 x16 (x4 mode) *3 4 x PCIe 2.0 x1 *4 |
| Storage: | 6 x SATA 6Gb/s port(s), yellow 2 x SATA 6Gb/s port(s), dark brown |
| LAN: | Intel I217V, 1 x Gigabit LAN Controller(s) |
| Wireless Data Network: | Wi-Fi 802.11 a/b/g/n Supports dual band frequency 2.4/5 GHz |
| Bluetooth: | Bluetooth V4.0 |
| Audio: | Realtek ALC1150 8-Channel High Definition Audio CODEC - High quality 112 dB SNR stereo playback output (Line-out at rear) and 104 dB SNR recording input (Line-in) Audio Feature : - Absolute Pitch 192kHz/ 24-bit True BD Lossless Sound - DTS Ultra PC II - DTS Connect - Optical S/PDIF out port(s) at back panel - BD Audio Layer Content Protection |
| USB Ports: | 4 x USB 3.0/2.0 port(s) (2 at back panel, blue, 2 at mid-board) 8 x USB 2.0/1.1 port(s) (8 at mid-board) 4 x USB 3.0/2.0 port(s) (4 at back panel, blue) |
| Back I/O Ports: | 1 x PS/2 keyboard/mouse combo port(s) 1 x DVI-D 1 x D-Sub 1 x DisplayPort 1 x HDMI 1 x LAN (RJ45) port(s) 6 x USB 3.0 (blue) 1 x Optical S/PDIF out 6 x Audio jack(s) 1 x ASUS Wi-Fi GO! module (Wi-Fi 802.11 a/b/g/n and Bluetooth v4.0/3.0+HS) |
| Internal I/O Ports: | 1 x USB 3.0 connector(s) support(s) additional 2 USB 3.0 port(s) (19-pin) 4 x USB 2.0 connector(s) support(s) additional 8 USB 2.0 port(s) 1 x TPM header 8 x SATA 6Gb/s connector(s) 1 x CPU Fan connector(s) (1 x 4 -pin) 1 x CPU OPT Fan connector(s) (1 x 4 -pin) 4 x Chassis Fan connector(s) (4 x 4 -pin) 1 x S/PDIF out header(s) 1 x 24-pin EATX Power connector(s) 1 x 8-pin ATX 12V Power connector(s) 1 x Front panel audio connector(s) (AAFP) 1 x System panel(s) (Q-Connector) 1 x DirectKey Button(s) 1 x DRCT header(s) 1 x MemOK! button(s) 1 x TPU switch(es) 1 x EPU switch(es) 1 x Power-on button(s) 1 x Clear CMOS jumper(s) 1 x USB BIOS Flashback button(s) |
| Accessories: | User's manual I/O Shield 4 x SATA 6Gb/s cable(s) 1 x ASUS 2T2R dual band Wi-Fi 1 x SLI bridge(s) 1 x Q-connector(s) (2 in 1) |
| BIOS: | 64 Mb Flash ROM, UEFI AMI BIOS, ASUS EZ Flash 2 |
| Form Factor: | ATX Form Factor 12 inch x 9.6 inch ( 30.5 cm x 24.4 cm ) |
Packaging & Accessories
Let's start off with the packaging because that's the first thing we'll see when we receive the product. The retail packaging feels sturdy and is overall great and also very attractive. Everything that you need to know about the motherboard is presented right in front of you. Before, we were used to seeing Asus's packages with the typical blue color scheme but this time Asus has gone with a black and gold color scheme which looks absolutely fantastic.
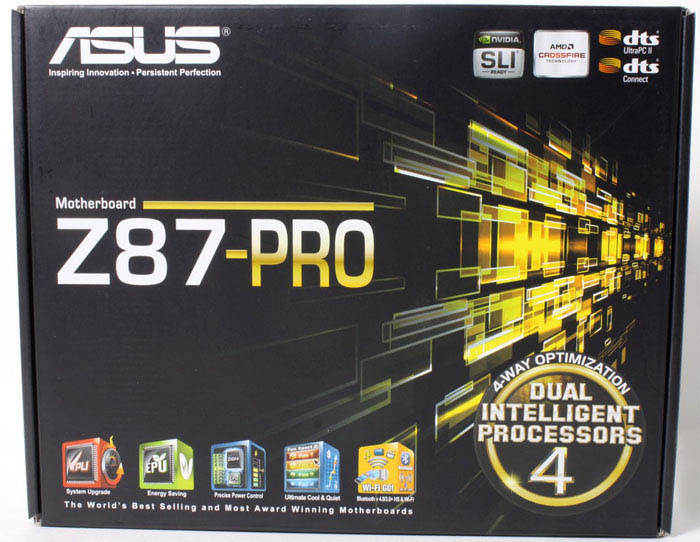
On the front cover we have the name of the motherboard written in big text and the "Z87" is in white color and the "-Pro" is in gold color that obviously indicates the gold color scheme that's used in the motherboard. Below this text, we can see specific features like TPU System Upgrade, EPU Energy Savings, Wi-Fi Go!, Digi+Power control and Ultimate Cool and Quite combination with Fan Xpert 2. On the right we can see the Dual Intelligent Processors 4, SLI Support, and CrossFire Support which I will get into detail later.
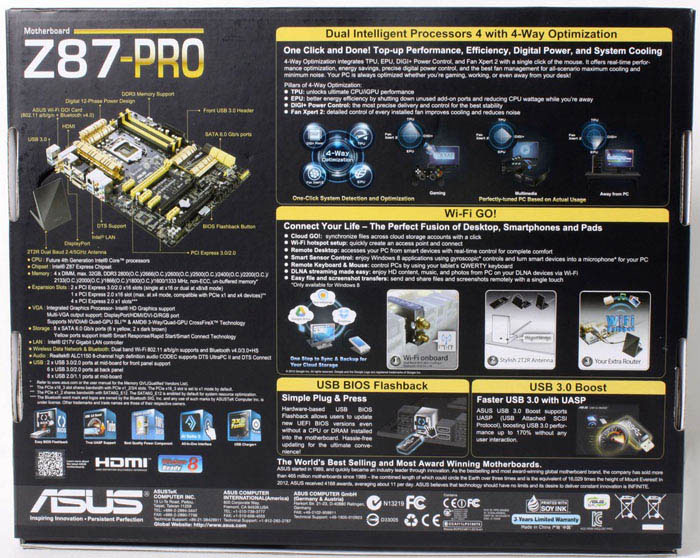
On the back of the package, we have all the features that are on the front cover but explained into further detail and specifically what each one does. We can also see the layout of the motherboard and where everything is placed. The motherboard itself is placed inside an anti-static bag for protection as you would expect. Asus has always done a fine job at making sure their motherboards are well secured inside the box. Beneath the motherboard, we will find the typical accessories that you would expect from any motherboard manufacture to include.
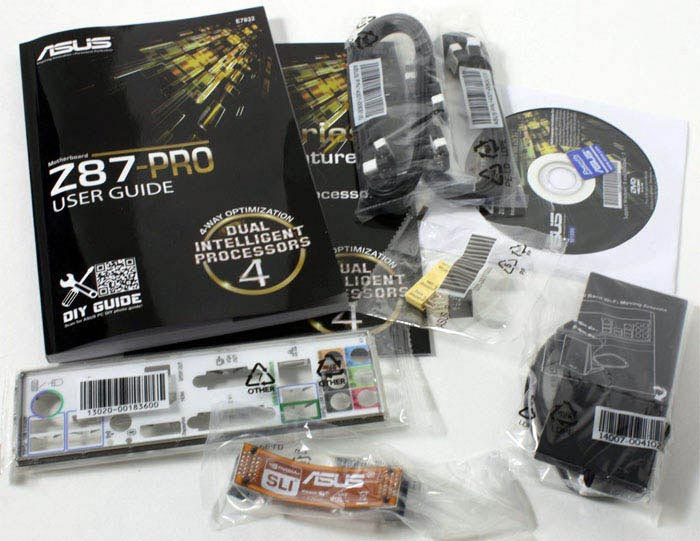
Here are all the accessories that you will find inside the box.
It comes with four DDR3 DIMM slots supporting up to 32GB of ram in dual channel mode and can even support ram up to 2800Mhz-3000Mhz
if you can overclock it. If something goes wrong when installing a new hardware,
the LED display on the board will give you an error code which then you can use to look up what the problem is.
The LED display is always on and when there isn't an error, it displays the BIOS version.
This feature can be quite handy when troubleshooting new hardware and really easy to figure out what exactly is not working properly.
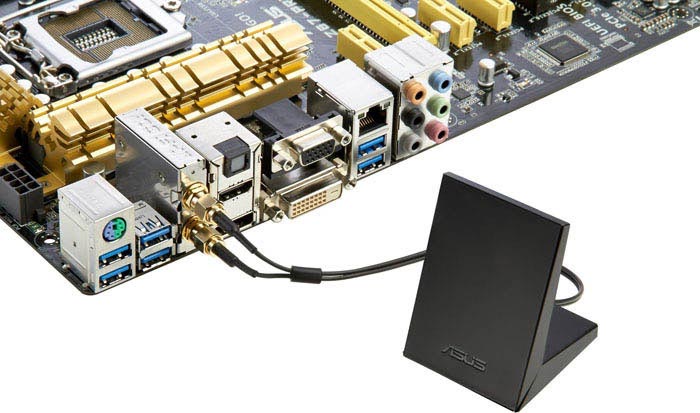
Back I/O Ports
* PS/2 keyboard/mouse combination port(s)
* DVI-D
* D-Sub
* DisplayPort
* HDMI
* LAN (RJ45) port(s)
* 6 x USB 3.0 (blue)
* Optical S/PDIF out
* 6 x Audio jack(s)
* Asus Wi-Fi GO! module (Wi-Fi 802.11 a/b/g/n and Bluetooth v4.0/3.0+HS)
An excellent feature that Asus has implemented into their boards is the USB BIOS Flashback button.
You can use this to flash the BIOS without having to boot the system into the UEFI BIOS which makes it much easier.
There's no need to have a CPU, memory, or GPU installed in the motherboard to update your BIOS. You simply plug in a
USB drive with the correct BIOS file and press the button for 3 seconds until the integrated LED begins to flash.
AI Suite III
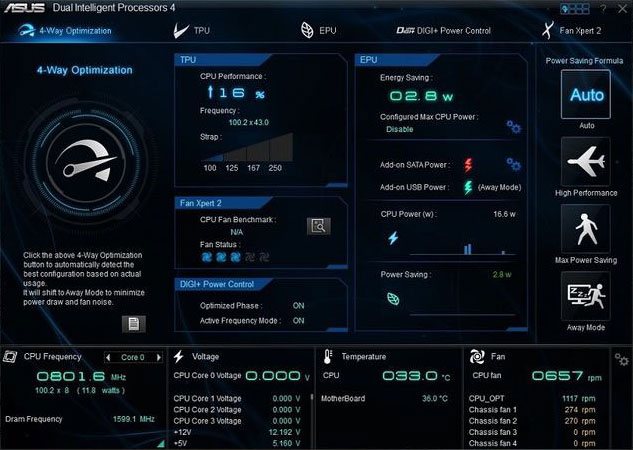
The Asus Z87-Pro comes with the brand new AI Suite III which makes overclocking extremely easy even for first time users. With the new AI Suite III, you have pretty much control over your entire motherboard and when I say you have control over your entire motherboard, I really mean it. When using AI Suite III, you are presented with five sections at the top and each one does its specific thing. You have the option of putting your computer in power saving mode to reduce as much electricity as possible or set it to high performance to get the most out of your computer. You can customize your fan speeds for silent mode, automatically/manually overclock your CPU and many more which I'll explain into details below.
When you first open up AI Suit III, the first section that you will see is the 4-Way Optimization section and this deals mostly with automatic overclocking, optimizing fan speed and power savings options. At the bottom of this section, we can see our current CPU frequency, Dram frequency, the voltage for each core, temperature of the CPU/Motherboard and how fast each fan in your case is running at. Also, on the side you have four power saving modes, Auto, High Performance, Max Power Saving and Away Mode. This section will mostly display the settings your current components are running at; you can't really tweak anything here.
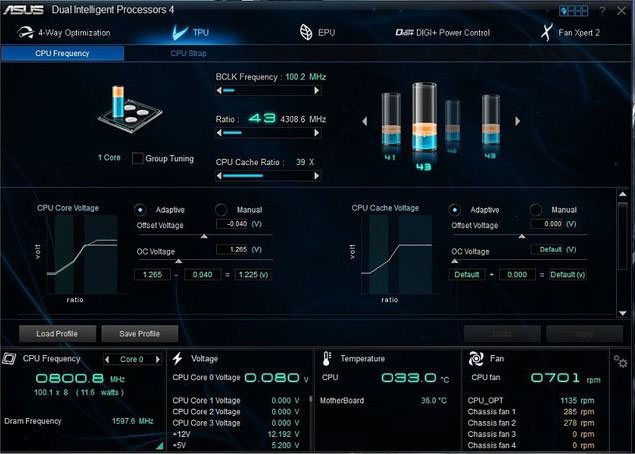
The next section of the AI Suite III is the TPU section and this is where you will be spending most of your time tweaking your CPU settings and overclocking it. Here we have adjustable settings for BCLK, CPU Ratio, CPU Cache Ratio, Voltages and CPU Cache. Overclocking has never been this easy and Asus has done a fantastic job at improving their software. I know some of the earlier versions of AI Suit had some glitches but it seems like Asus has fixed all of them. I remember one glitch in the earlier version of AI Suite where it would report a different CPU temperature than what it actually was in the BIOS but this seems fixed now.
There is a checkbox called Group Tuning that allows for adjusting each core individually or all cores at once. On the side of this section, we have four cylinders and each one represents each core of the CPU. You can also overclock each core differently if you like and it will show you the result using the cylinder. There is a subsection in the TPU section marked CPU Strap where you can change the CPU Strap to 100, 125, 167, and 250. At the bottom of this section, we can see the sensors for voltages, temperatures and fan speeds.
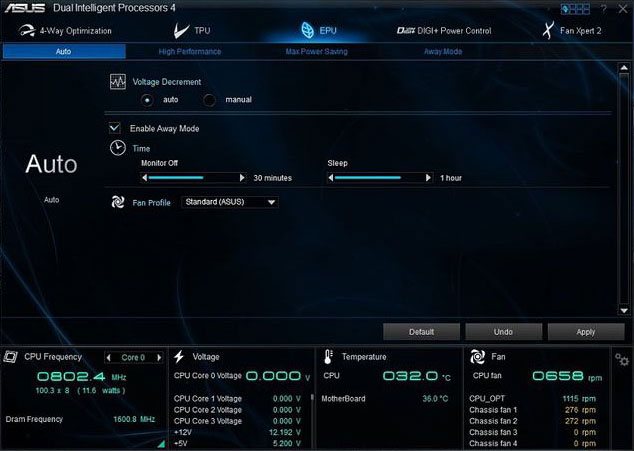
The third section is the EPU and this is specifically designed for power saving options. There are four subsections in the EPU section, Auto, High Performance, Max Power Saving and Away Mode. You have the option to set the voltage decrement to either auto or manual. You can also undervolt the CPU to conserve as much energy as possible. You can control your monitor sleep time, computer sleep, fan profiles and you can even turn off the USB controller power if a device is not attached to save as much energy as possible.
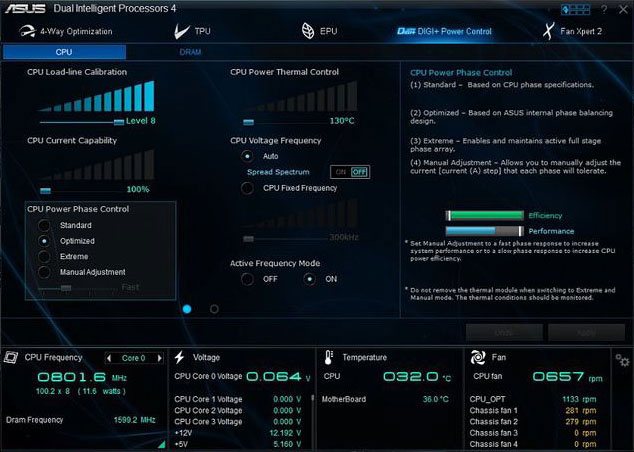
The fourth section is the Digi+Power Control and here you have two subsections, one for CPU and for RAM. The CPU section contains settings for load-line calibration, CPU Power Phase Control which can be set to either: Standard, Optimized, Extreme or Manual Adjustment. You also have CPU Current Capability, CPU Power Thermal Control, Voltage Frequency, CPU Power Duty Control and Active Frequency Mode which can be set to either OFF or ON. There are so many options in this section that you can play around with and get awesome overclocks. The memory subsection has adjustable settings for DRAM Current Capability, DRAM Voltage Frequency and DRAM power phase control. You can overclock your RAM with literally one mouse click and you don't have to constantly reboot into BIOS and keep tweaking the settings.
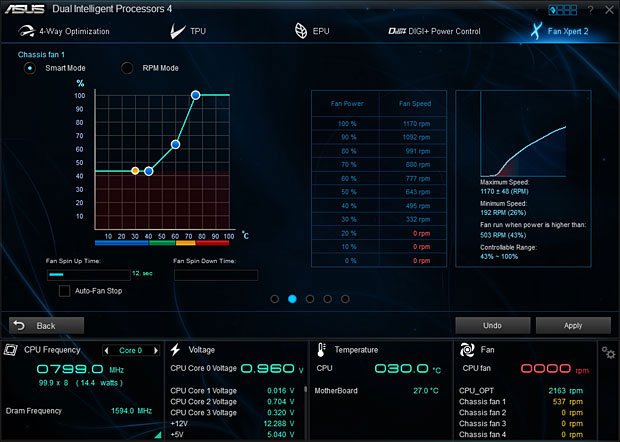
The fifth section is the Fan Xpert 2 and this is probably my favourite feature of the AI Suite III because it allows you full much control over every single fan in your case, from the CPU fan to each individual case fans. You have four profiles to choose from when you click the Fan Xpert 2 section, Silent, Standard, Turbo and Full Speed. You can set the fan in `silent' mode if you are doing light tasks such as watching YouTube videos or browsing the internet and you won't even hear the computer running. If you are going to be playing intensive games such as BF3, Crysis 3 or Metro LL then consider choosing a different fan profile.
Test Setup & Methodology & Boot Time
| Test Setup | |
|---|---|
| Processor: | Intel i7 4770K 3.5 GHz (3.9 GHz Turbo) | Heatsink: | Noctua NH-U14S | Thermal Compound: | Noctua NT-H1 |
| RAM: | Kingston HyperX 8GB @ 1866 MHz |
| Graphics Card: | EVGA GTX 680 |
| Storage: | Samsung 840 Pro 256GB |
| Power Supply: | Antec Earth Watts 650W |
| Case: | Antec Nine Hundred |
| OS: | Windows 7 64Bit |
| Motherboards: | Asus Z87-Pro Asus Maximus VI Hero Asus Maximus VI Gene Gigabyte Z87X-UD3H MSI Z87-GD65 Gaming |
| Benchmarks | |
|---|---|
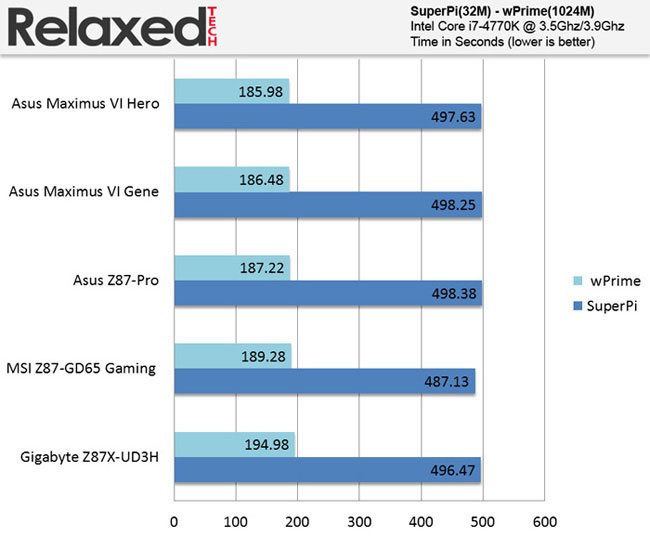
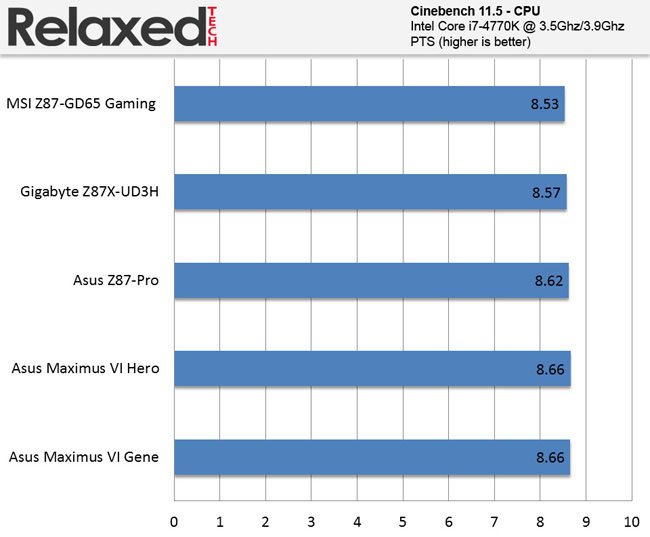
| System Benchmarks: | Cinebench 11.5 7-Zip wPrime 1024M SuperPi 32M CrystalDiskMark |
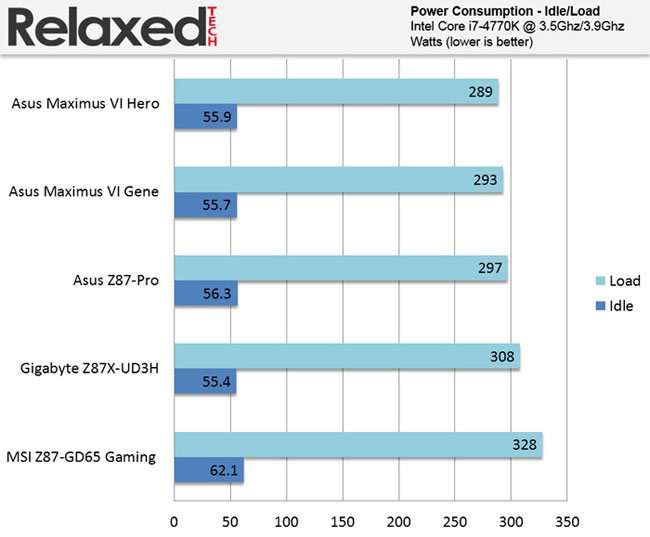
All testing is done on a clean Windows 7 Ultimate SP1 64bit on the Samsung 840 Pro 256GB SSD and nothing running in the background. Power consumption was tested on the system as a whole with a wall meter connected to the Antec Earth Watts 650W.
Idle power consumption was measured after leaving the computer in idle for 10 minutes. Load power consumption was measured after leaving the computer under full load for 10 minutes. The testing was conducted with motherboard power-saving options enabled because that's what most people will be running it at. All the games were tested at ultra settings at 1920x1080.
Moving on to the boot time, here we will be testing how long it takes to boot from the time when pressing the ON button to when Windows 7 starts loading. Each board was tested with and without fast-boot options enabled.
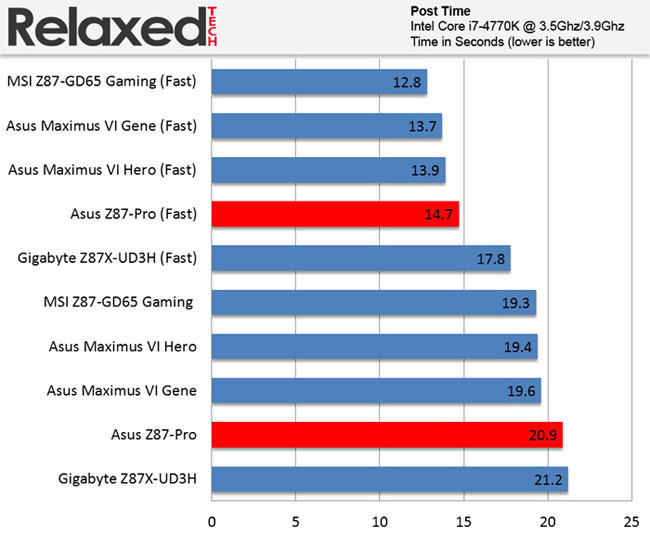
The MSI Z87-GD65 Gaming board takes the lead as the fastest Haswell booting board but not with much difference. There's only a 1.9 seconds difference between the two of them and it doesn't really mean anything in the real world.
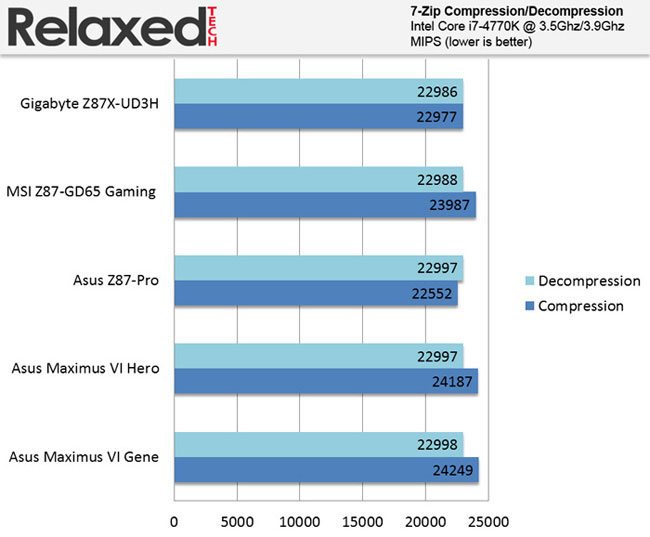
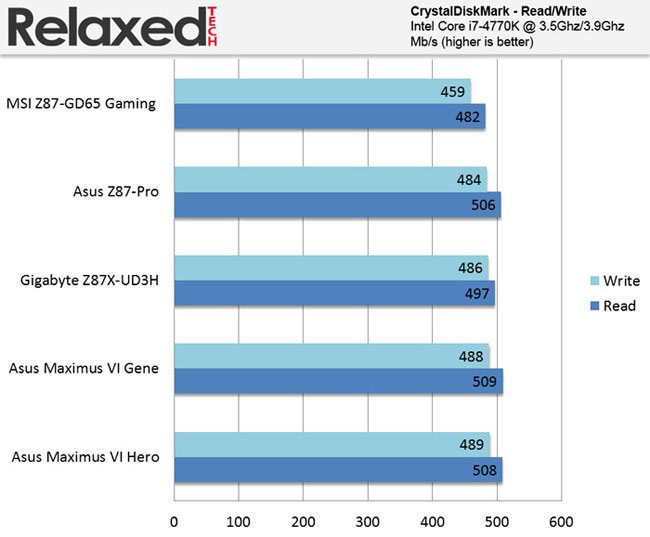
Benchmark Results & Power Consumption
Conclusion
The Asus Z87-Pro is an outstanding motherboard loaded with a ton of high end features. It may not have all the features that the ROG or TUF boards have but it's still an excellent mid-range motherboard. The gold color scheme may not appeal to everyone but I think it's better than what it was before.
Pros:
+ Comes Loaded With High-End Features
+ Outstanding UEFI BIOS
+ Overclocking Made Easy With AI Suite III
+ Fast USB 3.0 Speeds
+ Great Packaging and Accessories
+ Debug Display
Cons:
- Pricey for a mid-range motherboard
- Color scheme may not appeal to everyone
It has a superb UEFI BIOS that's probably the best out of all and the amount of SATAIII and USB 3.0
ports is mind-blowing. Boot times, SATAIII and USB 3.0 performance is outstanding with this motherboard.
The Asus Z87-Pro retails for $199.00 (Amazon) and it does cost a little bit more than other mid-range motherboards out there and this might be a problem for some. Overall, this is a very attractive looking motherboard that doesn't disappoint and overclocking is so easy thanks to AI Suite III.
Final Score 8.8